On This Page
Recently, I found myself tasked with creating an upvote feature in an app I was working on. The app is using Sveltekit along with tRPC. Each upvote is recorded in a Redis instance
After deploying this feature to our beta users, we noticed that our logs and Redis database were going “brrrrr” 💨

There was no meeting necessary to realize that we needed to rate limit requests to ensure users weren’t abusing the system by upvoting too many items in a short timeframe.
However, as I delved into the work, I realized that there weren't many specific examples out there that illustrated how to implement rate limiting in a serverless environment with SvelteKit.
I decided to document my solution to this problem as I believe this can potentially help others facing the same problem.
And hey, what's a better way to demonstrate this than with something fun?
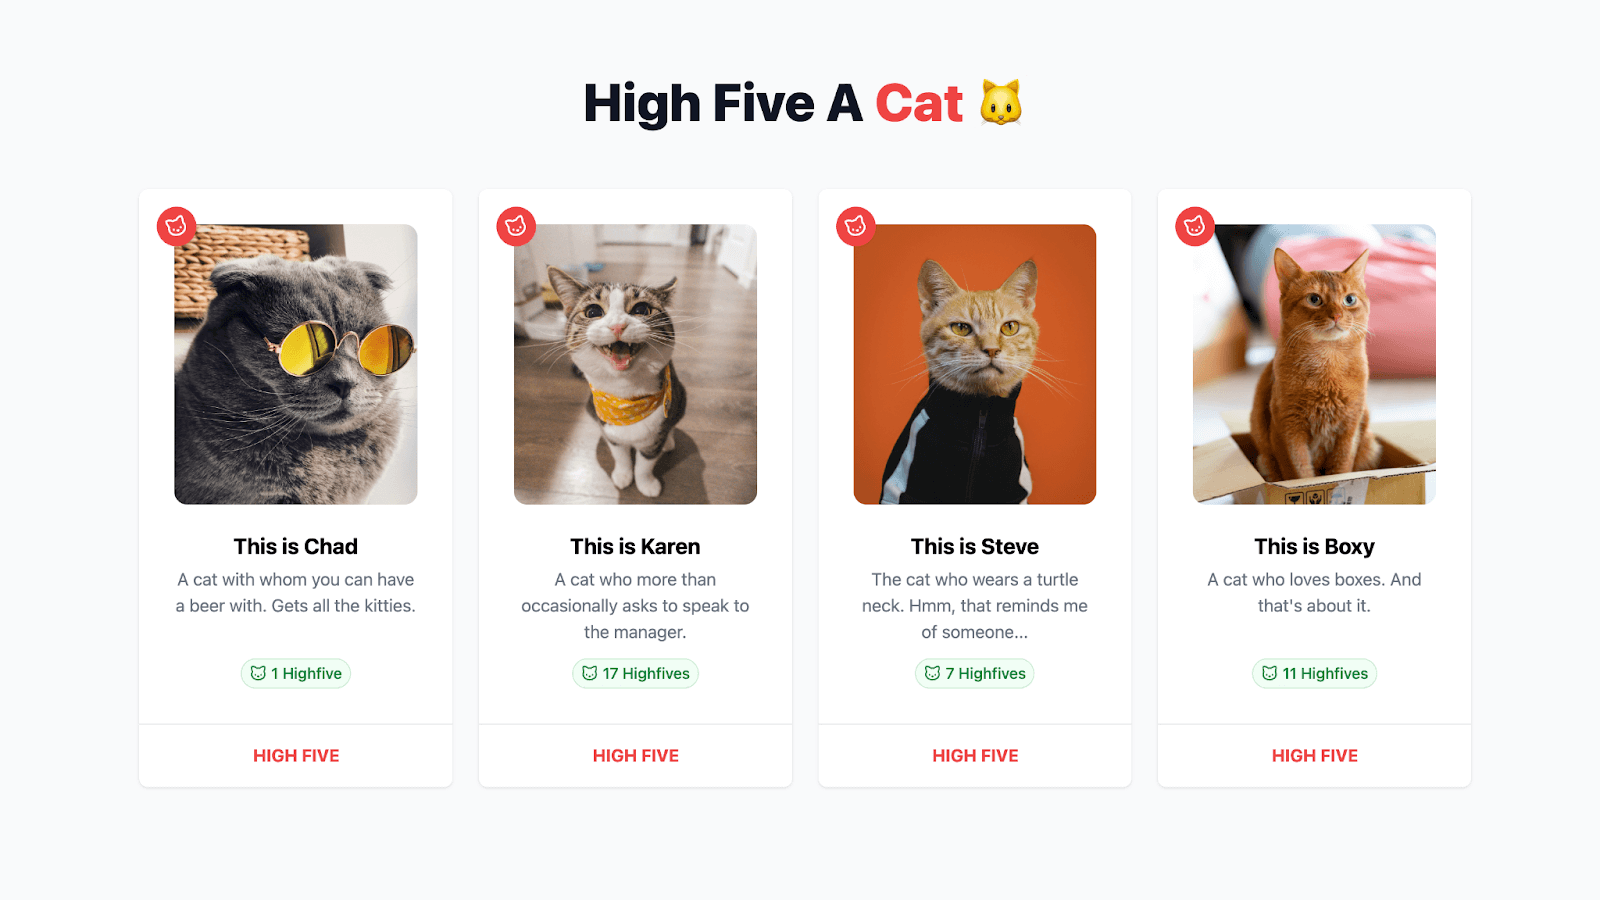
Introducing the 'High Five Cat' app!
And no, I didn’t use AI to create these cats… 🤫
In this app, there are pictures of 4 different cats. As a visitor, you can high five these cats. Each request is managed through the tRPC middleware. This middleware conducts a check based on the user's IP to determine if any rate limitations apply.
Before we start, this is tutorial is not limited to upvoting (or in this case a high five) but this can be applied to many different use-cases. With all of that said, let’s dive in.
Prerequisites
To get up and running with the app and following along you need:
- A fundamental understanding of SvelteKit, primarily regarding routes and server-side data loading.
- Basic to intermediate familiarity with tRPC, covering topics like routes, middleware, queries, and mutations.
- Access to a Redis instance for example, Upstash Redis.
Getting started
For the sake of efficiency, we won't be creating the entire application from scratch given that there’s a bit of initial boilerplate. Instead, you can clone the sveltekit-trpc-ratelimit directory from the Upstash examples repo.
After successfully downloading the repository, navigate into the application using the cd command and install the necessary dependencies via your preferred package manager and set the .env variables by duplicating .env.example.
Understanding the key parts
Here’s a quick rundown of all the important parts.
src/lib/api- This holds all tRPC logic, including routers and middleware.src/lib/api/routes/cat.router.ts– It specifies all logic for querying and mutating cat-related actions.src/lib/api/middlewares/rate...ware.ts– The middleware that manages each request and can potentially block it when the rate limit has exceeded.
src/routes/+page.server.ts- Renders the initial cats on the server.src/routes/+page.svelte- Loops through all the cats and showcases a cat in theCatCard.sveltecomponent.src/lib/components/CatCard.svelte- This component is where the magic happens. It displays the cat and allows the user to high five a cat.
Alright! It's time to break down the code and see the app in action!
Breaking down the code
Loading our cats data
In the +page.server.ts, we’ll return all the cats.
	import { trpcLoad } from '$lib/api/trpc-load';
import type { PageServerLoad } from './$types';

export const load = (async (events) => {
    return {
        cats: trpcLoad(events, (t) => t.public.cat.getMany())
    };
}) satisfies PageServerLoad;
We use trpcLoad(events, (t) => t.public.cat.getMany()) to load all the cats. I've wrote more about the useful trpcLoad helper here.
In our +page.svelte file, this data is consumed and rendered. The data object gets its properties from the public.cat.getMany method which provides us the list of cats. Then, each of these cats are rendered as individual CatCard.svelte components passing the cat info as a prop.
Each time a cat is high-fived we’ll refetch the cats using invalidateAll() to update the high five score.
	<script>
    import { invalidateAll } from '$app/navigation';
    import CatCard from '$lib/components/CatCard.svelte';
    import type { PageData } from './$types';

    export let data: PageData;

    $: ({ cats } = data);
</script>

<div class="mx-auto max-w-7xl pb-24 pt-10 sm:pb-32 lg:px-8 lg:py-40">
    <div class="mb-14 text-center">
        <h1 class="text-3xl font-extrabold text-gray-900 sm:text-4xl lg:text-5xl lg:leading-none mb-2">
            High Five A <span class="text-red-500">Cat</span> 🐱
        </h1>
    </div>

    <ul role="list" class="grid grid-cols-1 gap-6 sm:grid-cols-2 md:grid-cols-2 xl:grid-cols-4">
        {#each cats as cat (cat.id)}
            <CatCard
                {cat}
                on:highfive={() => {
                    invalidateAll();
                }}
            />
        {/each}
    </ul>
</div>
Implementing the UI
This component might look a bit daunting, but in essence all we’re doing is importing the tRPC client API and setting up the mutation that takes care of the high five. 👋
	<script lang="ts">import { cn } from "$lib/utils/class-utils";
import { ArrowUp, Cat as CatIcon } from "lucide-svelte";
import CatPawIcon from "./CatPawIcon.svelte";
import { fade, scale } from "svelte/transition";
import { page } from "$app/stores";
import { api } from "$lib/api/api";
import toast from "svelte-french-toast";
import { TRPCClientError } from "@trpc/client";
import { createEventDispatcher } from "svelte";
export let cat;
const dispatch = createEventDispatcher();
const client = api($page);
const highfiveMutation = client.public.cat.highfive.createMutation();
let error = null;
let showIcon = false;
const TOAST_DURATION = 1500;
async function highfive(catId) {
    try {
        await $highfiveMutation.mutateAsync({ id: catId });
        dispatch("highfive", { id: catId });
        toast.success("Highfived!", {
            duration: TOAST_DURATION
        });
    }
    catch (err) {
        if (err instanceof TRPCClientError) {
            error = "Sorry, you can only highfive 1 cat per minute.";
        }
        else {
            error = "Unknown error";
        }
        toast.error(error);
    }
}
$: loading = $highfiveMutation.isLoading;
$: success = $highfiveMutation.isSuccess;
$: if (success) {
    showIcon = true;
    setTimeout(() => {
        showIcon = false;
    }, TOAST_DURATION);
}
</script>

<li
    class="col-span-1 flex flex-col relative group divide-y divide-gray-200 rounded-lg bg-white text-center shadow"
>
    <div class="flex flex-1 flex-col p-8">
        <div class="relative">
            <div class="absolute -top-4 -left-4">
                <div
                    class="relative inline-flex group-hover:scale-[130%] group-hover:rotate-0 -rotate-[20deg] items-center p-1 h-9 w-9 justify-center rounded-full border border-transparent shadow-sm text-sm font-medium text-white bg-red-500 hover:bg-red-600 focus:outline-none focus:ring-2 focus:ring-offset-2 focus:ring-red-500 transition ease-in-out duration-150"
                >
                    <CatIcon class="h-5 w-5" />
                </div>
            </div>

            {#if showIcon}
                <div
                    in:scale={{ duration: 200, start: 0.2 }}
                    out:fade={{ duration: 100 }}
                    class="top-1/2 absolute left-1/2 transform rotate-[10deg] -translate-x-1/2 -translate-y-1/2"
                >
                    <div class="flex w-full justify-center text-center items-center flex-col text-white">
                        <CatPawIcon class="h-48 w-48" />
                    </div>
                </div>
            {/if}

            <img
                class="mx-auto h-64 w-64 flex-shrink-0 rounded-xl"
                src={cat.url}
                alt="{cat.name} portrait"
            />
        </div>

        <h3 class="mt-6 text-xl font-bold">
            This is {cat.name}
        </h3>

        <dl class="mt-1 flex flex-grow flex-col justify-between">
            <dt class="sr-only">Description</dt>
            <dd class="text-base text-gray-500">
                {cat.description}
            </dd>

            <dt class="sr-only">Highfives</dt>
            <dd class="mt-3">
                <span
                    class="inline-flex items-center rounded-full bg-green-50 px-2 py-1 text-sm font-medium text-green-700 ring-1 ring-inset ring-green-600/20"
                >
                    <CatIcon class="h-4 w-4 mr-1" />

                    {#if cat.highfives === 0 || cat.highfives === null}
                        0 Highfives
                    {:else if cat.highfives === 1}
                        {cat.highfives}
                        Highfive
                    {:else}
                        {cat.highfives}
                        Highfives
                    {/if}
                </span>
            </dd>
        </dl>
    </div>

    <div>
        <div class="-mt-px flex divide-x divide-gray-200">
            <div class="flex relative w-0 flex-1">
                <button
                    disabled={loading}
                    on:click={() => highfive(cat.id)}
                    class={cn(
                        'relative -mr-px group inline-flex w-0 flex-1 items-center justify-center gap-x-3 rounded-bl-lg border border-transparent py-4 text-base font-bold uppercase text-red-500',
                        loading && 'cursor-wait opacity-50'
                    )}
                >
                    High five
                </button>
            </div>
        </div>
    </div>
</li>
When the high five button is clicked, a request is made to the tRPC route, where we check whether the cat exists and we'll store high five in Redis.
	import publicProcedure from '$lib/api/procedures/publicProcedure';
import { router } from '$lib/api/trpc';
import { TRPCError } from '@trpc/server';
import { ZCatSchema } from './cat.schema';

const getHighfiveKey = (id: string) => `highfive:${id}`;

export const catRouter = router({
    highfive: publicProcedure
        .input(ZCatSchema)
        .mutation(async ({ input, ctx: { getClientAddress } }) => {
            const cat = cats.find((cat) => cat.id === input.id);

            if (!cat) {
                throw new TRPCError({
                    code: 'NOT_FOUND',
                    message: 'Cat not found'
                });
            }

            const identifier = getHighfiveKey(input.id);
            const result = await redis.incr(identifier);

            return {
                ...cat,
                highfives: result
            };
        })
});
If the mutation is successful we’ll dispatch an event that tells the +page.svelte to refetch the page to get the recent data using invalidateAll().
	<script lang="ts">import { invalidateAll } from "$app/navigation";
import CatCard from "$lib/components/CatCard.svelte";
export let data;
$: ({ cats } = data);
</script>

<div class="mx-auto max-w-7xl pb-24 pt-10 sm:pb-32 lg:px-8 lg:py-40">
    <div class="mb-14 text-center">
        <h1 class="text-3xl font-extrabold text-gray-900 sm:text-4xl lg:text-5xl lg:leading-none mb-2">
            High Five A <span class="text-red-500">Cat</span> 🐱
        </h1>
    </div>

    <ul role="list" class="grid grid-cols-1 gap-6 sm:grid-cols-2 md:grid-cols-2 xl:grid-cols-4">
        {#each cats as cat (cat.id)}
            <CatCard
                {cat}
                on:highfive={() => {
                    invalidateAll();
                }}
            />
        {/each}
    </ul>
</div>
Implementing the rate limiting
With that initial code in place, we’re ready to implement the rate limiting feature.
I’ve chosen to use tRPC middleware rather than directly adding the code to the route itself. This improves code readability, but it can also be potentially re-used for other routes.
In this example, our use case is rather specific use case but in your application you might get away with using one rate limit for all your routes. Probably the most common use case for protecting each route in advance is to be prepared for a DDoS attack.

Now, let's break down the highfiveRatelimitMiddleware piece by piece. 👇
The highfiveRatelimitMiddleware begins by importing necessary modules and initialising a ratelimit object from the [@upstash/ratelimit](https://github.com/upstash/ratelimit#docs) package that contains our Redis client and the specifics of our rate limiter. In this case, Ratelimit.slidingWindow(1, "60 s") specifies that only one request will be allowed every 60 seconds.
	import { redis } from '$lib/config/upstash';
import { TRPCError } from '@trpc/server';
import { middleware } from '../trpc';
import { Ratelimit } from '@upstash/ratelimit';

const ratelimit = new Ratelimit({
    redis: redis,
    limiter: Ratelimit.slidingWindow(1, '60 s')
});
The highfiveRatelimitMiddleware can be thought of as a checkpoint between the user's request and the server. It keeps tabs on three important things:
path: Is the identifier for each tRPC route—which may look like this:public.user.get.next: This represents what comes after this checkpoint. If everything is in order, thenextfunction is called.getClientAddress: The IP address of the client making the request is determined usinggetClientAddress(). This is a function from theRequestEventobject in SvelteKit, on which you can read more about here.
The identifier for the rate limit is then created using the path and the ip, making it unique for each route and IP address.
The identifiers used in the rate limiter can be constant strings to limit all requests with a single rate limit, or they can be user-specific like userID, API key, IP address for individual limits.
	// Rest of code ommitted for brevity
middleware(async ({ path, next, ctx: { getClientAddress, setHeaders } }) => {
    const ip = getClientAddress();
    const identifier = `${path}-${ip}`;

    return next();
});
The ratelimit.limit(identifier); method is then used to get the rate limit information for this request. If the result.success property is false, it means that the request has exceeded the rate limit and the middleware returns a TRPCError with TOO_MANY_REQUESTS code and information about the current limit and the remaining number of requests.
	const result = await ratelimit.limit(identifier);

if (!result.success) {
    throw new TRPCError({
        code: 'TOO_MANY_REQUESTS',
        message: JSON.stringify({
            limit: result.limit,
            remaining: result.remaining
        })
    });
}
If the result is successful, the middleware calls next(), allowing the request to continue to the next middleware or handler.
	// Rest of code ommitted for brevity
middleware(async ({ path, next, ctx: { getClientAddress, setHeaders } }) => {
    return next();
});

export default highfiveRatelimitMiddleware;
As you can see, the highfiveRatelimitMiddleware can be easily adjusted with a different limiter to protect all your tRPC routes as the identifier is unique per path and IP.
Upstash's Ratelimit provides several algorithms such as Fixed Window, Sliding Window, and Token Bucket, each with its own strengths, weaknesses, and specific use cases.. You can learn more about the different algorithms here.
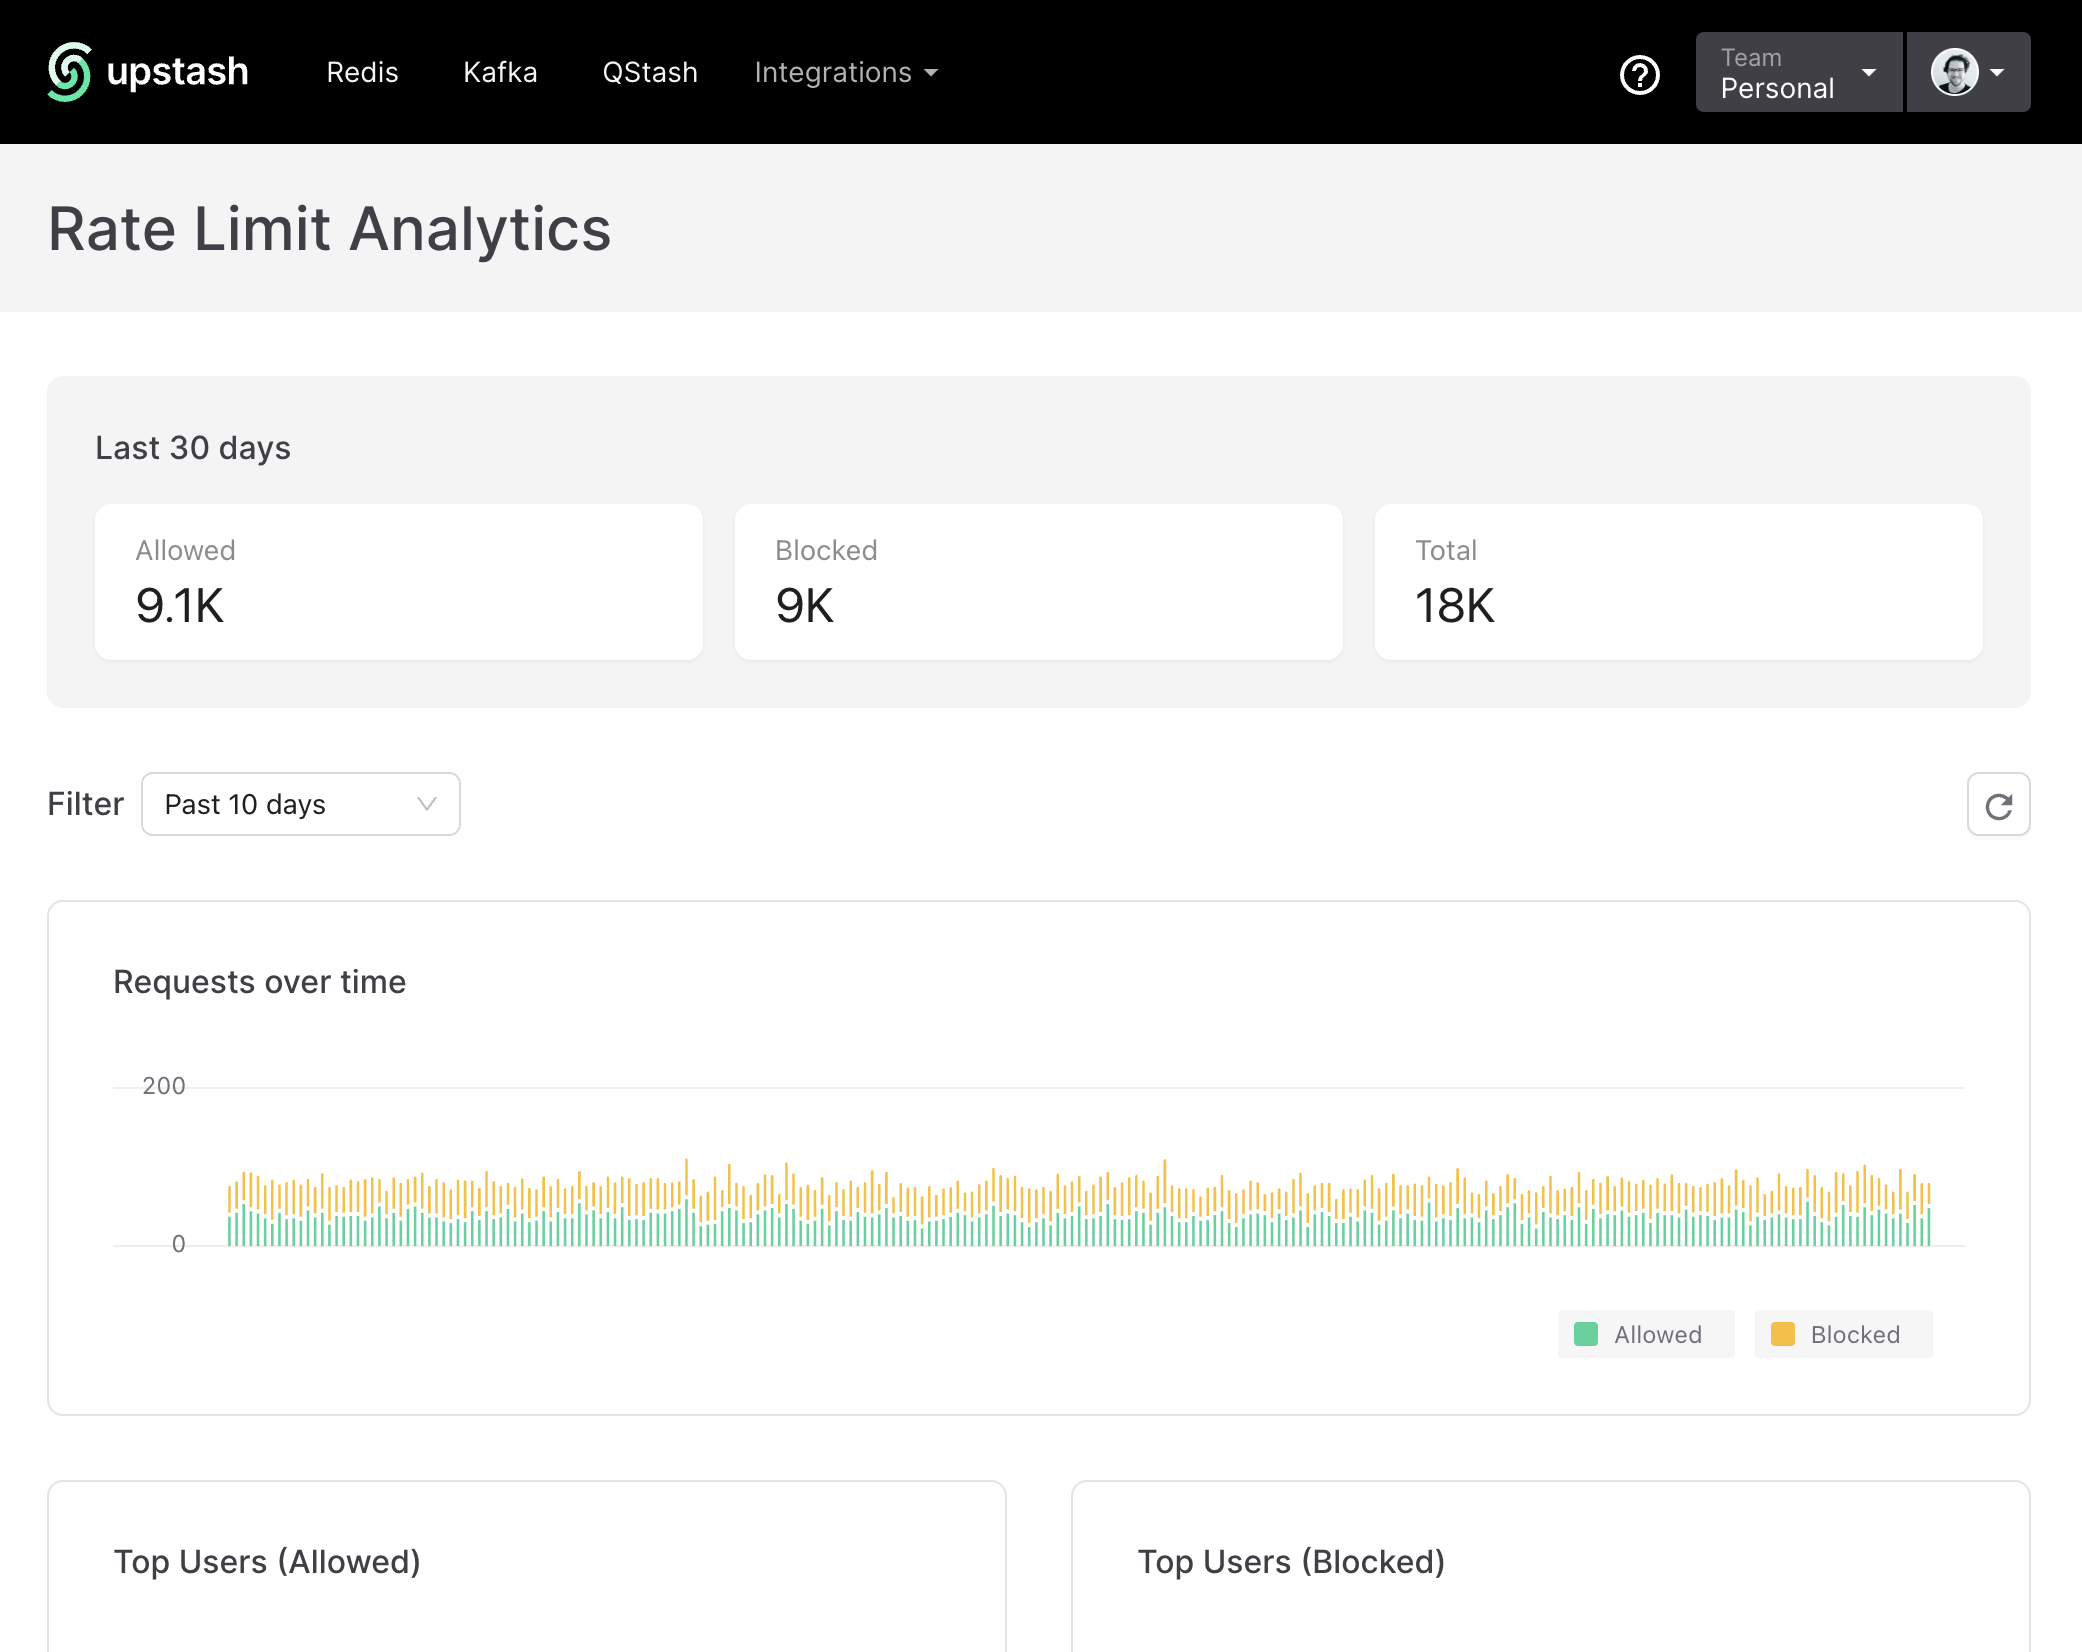
One more thing I like to mention is that analytics can be enabled to get insights about your rate limiting.
	const ratelimit = new Ratelimit({
    redis: redis,
    limiter: Ratelimit.slidingWindow(1, '60 s'),
    analytics: true // <-- Set to true to get more details on the performance of your ratelimiting
});
If you choose to do so you get access to a special dashboard on Upstash to get more details on how your rate limiting is performing.
Wrapping up
Phew, hopefully that was easy to understand and not too much information to digest at once.
Now all is left to do for us is to import our middleware and use it in our tRPC route.
	import publicProcedure from '$lib/api/procedures/publicProcedure';
import { router } from '$lib/api/trpc';
import { TRPCError } from '@trpc/server';
import { ZCatSchema } from './cat.schema';
import cats from './cats.json';
import highfiveRatelimitMiddleware from '../middlewares/ratelimitMidleware';
import { redis } from '$lib/config/upstash';

const getHighfiveKey = (id: string) => `highfive:${id}`;

export const catRouter = router({
    highfive: publicProcedure
        .use(highfiveRatelimitMiddleware) // <-- our middleware
        .input(ZCatSchema)
        .mutation(async ({ input, ctx: { getClientAddress } }) => {
            const cat = cats.find((cat) => cat.id === input.id);

            if (!cat) {
                throw new TRPCError({
                    code: 'NOT_FOUND',
                    message: 'Cat not found'
                });
            }

            const identifier = getHighfiveKey(input.id);
            const result = await redis.incr(identifier);

            return {
                ...cat,
                highfives: result
            };
        })
});
The .use(highfiveRatelimitMiddleware)means that every time the highfive route is called, it will pass through our rate limit middleware before being processed.
You might be curious to see how this looks from a user perspective. Below is a quick video showcasing what happens when the rate limit is reached.
And here’s what the request headers look like for each request.

Now before I wrap up, here are some potential improvements:
- The
getClientAddressfunction used in this demo might not always yield the correct IP address. Make sure you read the SvelteKit docs to fully understand how this function works. - You could make the middleware part of a tRPC procedure for better code organization and reusability.
- There is an open source rate limit package for tRPC with a Upstash adapter that could suit your needs. There’s not much documentation on it however.
And remember, this example might not fit all use cases as it is intended to demonstrate a specific scenario.
Your app may have different requirements, so it’s crucial to thoroughly research and understand your unique needs before implementing any measures.
In conclusion, setting up rate limiting with tRPC middleware and Upstash is quite straightforward. Whether you need to prevent DDoS attacks or to simply regulate resource usage, I feel like Upstash Ratelimit covers those areas quite well.
Appreciate your time reading this blog post. For more insightful discussion or to ask questions, you should come hang out in the Upstash Discord community.
Happy coding!